MicroStation® is Bentley Systems flagship product for 3D computer-aided-design (CAD). Questions similar to this appear on the Be Community Forums. This problem appeared in the MicroStation Programming Forum.
Q How do I create a pipe using MicroStation VBA?
Q How do I create a cylinder using MicroStation VBA?
Pipes, Cones and Cylinders
First, this article assumes that you want to create a 3D pipe in a 3D DGN model. You also need to think about the representation of a pipe. Is a pipe simply a round surface of given diameter between points A and B, or should it have a wall thickness more representative of, say, a concrete casting?
Depending on your goals, there are several element types that serve to represent a 3D pipe …
- Pipes having 'solid' walls
- A torus extruded along a vector — creates a solid or surface of extrusion
- A SmartSolid
- Pipes having no thickness
- A cone having equal top and bottom radii
- A SmartSurface
From the VBA programmer's point of view, there's not a lot to choose between an extruded torus and a cone having equal radii. A cone always creates a pipe having a circular cross-section, whereas the extrusion may have any cross-section. If you're drawing, say, HVAC air ducts having a rectangular cross-section then the extrusion is the only simple solution.
The SmartSolid or SmartSurface approach became available with MicroStation V8i SS3
and later.
There are several ways to approach the problem to produce a SmartSolid or SmartSurface end result,
including the SmartSolid.CreateCone method.
If you want to create a 'physical' pipe having a finite wall thickness, then you need two concentric extrusions or cones which are capped at each end with an annulus.
VBA Project: Create Pipes

A VBA project CreatePipe.mvba provides answers to the above questions.
It's a complete working VBA project with source code.
The answers on this page explain the code's purpose.
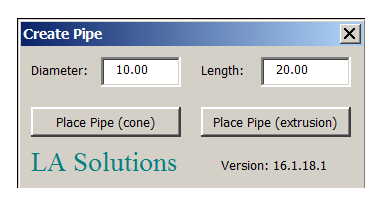
The Create Pipe project has a user interface provided by a VBA UserForm.
There's a text box to let you modify the pipe diameter, and another to show the length of the
pipe just placed.
Two command buttons let you create a new pipe either as a MicroStation cone element or
as a SmartSolid created from an extruded cylinder.
Pipe Diameter
The tool responds dynamically to the value in the Diameter text box.
As you change the diameter value in the UserForm,
the pipe is drawn with the new diameter.
Pipe Length
The UserForm shows the length of the last pipe placed.
Primitive Commands
The pipe creation tools Place Pipe (cone) and Place Pipe (extrusion) are each implemented in a VBA class.
The class Implements IPrimitiveCommandEvents.
You can read more about the IPrimitiveCommandEvents class in VBA help.
The code shows how to pass data between your UserForm and the IPrimitiveCommandEvents class.
The class has a member variable refering to that UserForm …
Private m_oParent As frmCreatePipe
We assign the UserForm in class Property Set Parent …
Public Property Set Parent(ByVal oFrm As frmCreatePipe)
    Set m_oParent = oFrm
End Property
We create the class by clicking one of the Place Pipe command buttons on the UserForm.
Then we assign the UserForm to the class
The class checks the UserForm diameter each time it wants to create a pipe.
The diameter of the pipe continually reflects the value in the form.
That's true even during dynamics: as you move the mouse to redraw the pipe, it
checks the current diameter.
